> ## Documentation Index
> Fetch the complete documentation index at: https://docs.stackryze.com/docs/llms.txt
> Use this file to discover all available pages before exploring further.
# Cloudflare
> Connect a Stackryze Domain to Cloudflare DNS in seven steps.
Use Cloudflare as the DNS provider for your Stackryze Domain. This is the recommended setup for most users.
## Why Cloudflare?
* **Free** — no cost for DNS hosting.
* **Fast global network** — 300+ data centers.
* **DDoS protection** — built-in.
* **Free SSL** — automatic HTTPS for your subdomain.
* **Easy to use** — clean dashboard.
* **API access** — automate DNS management.
## Prerequisites
Before you begin:
* ✅ A registered Stackryze Domain on [domain.stackryze.com](https://domain.stackryze.com/).
* ✅ A free Cloudflare account — [sign up here](https://cloudflare.com).
Haven't registered your subdomain yet? See [Getting started](/docs/guides/domains/getting-started).
## Step 1 — Add your subdomain to Cloudflare
1. Sign in to the [Cloudflare dashboard](https://dash.cloudflare.com/).
2. Click **Add a Site**.
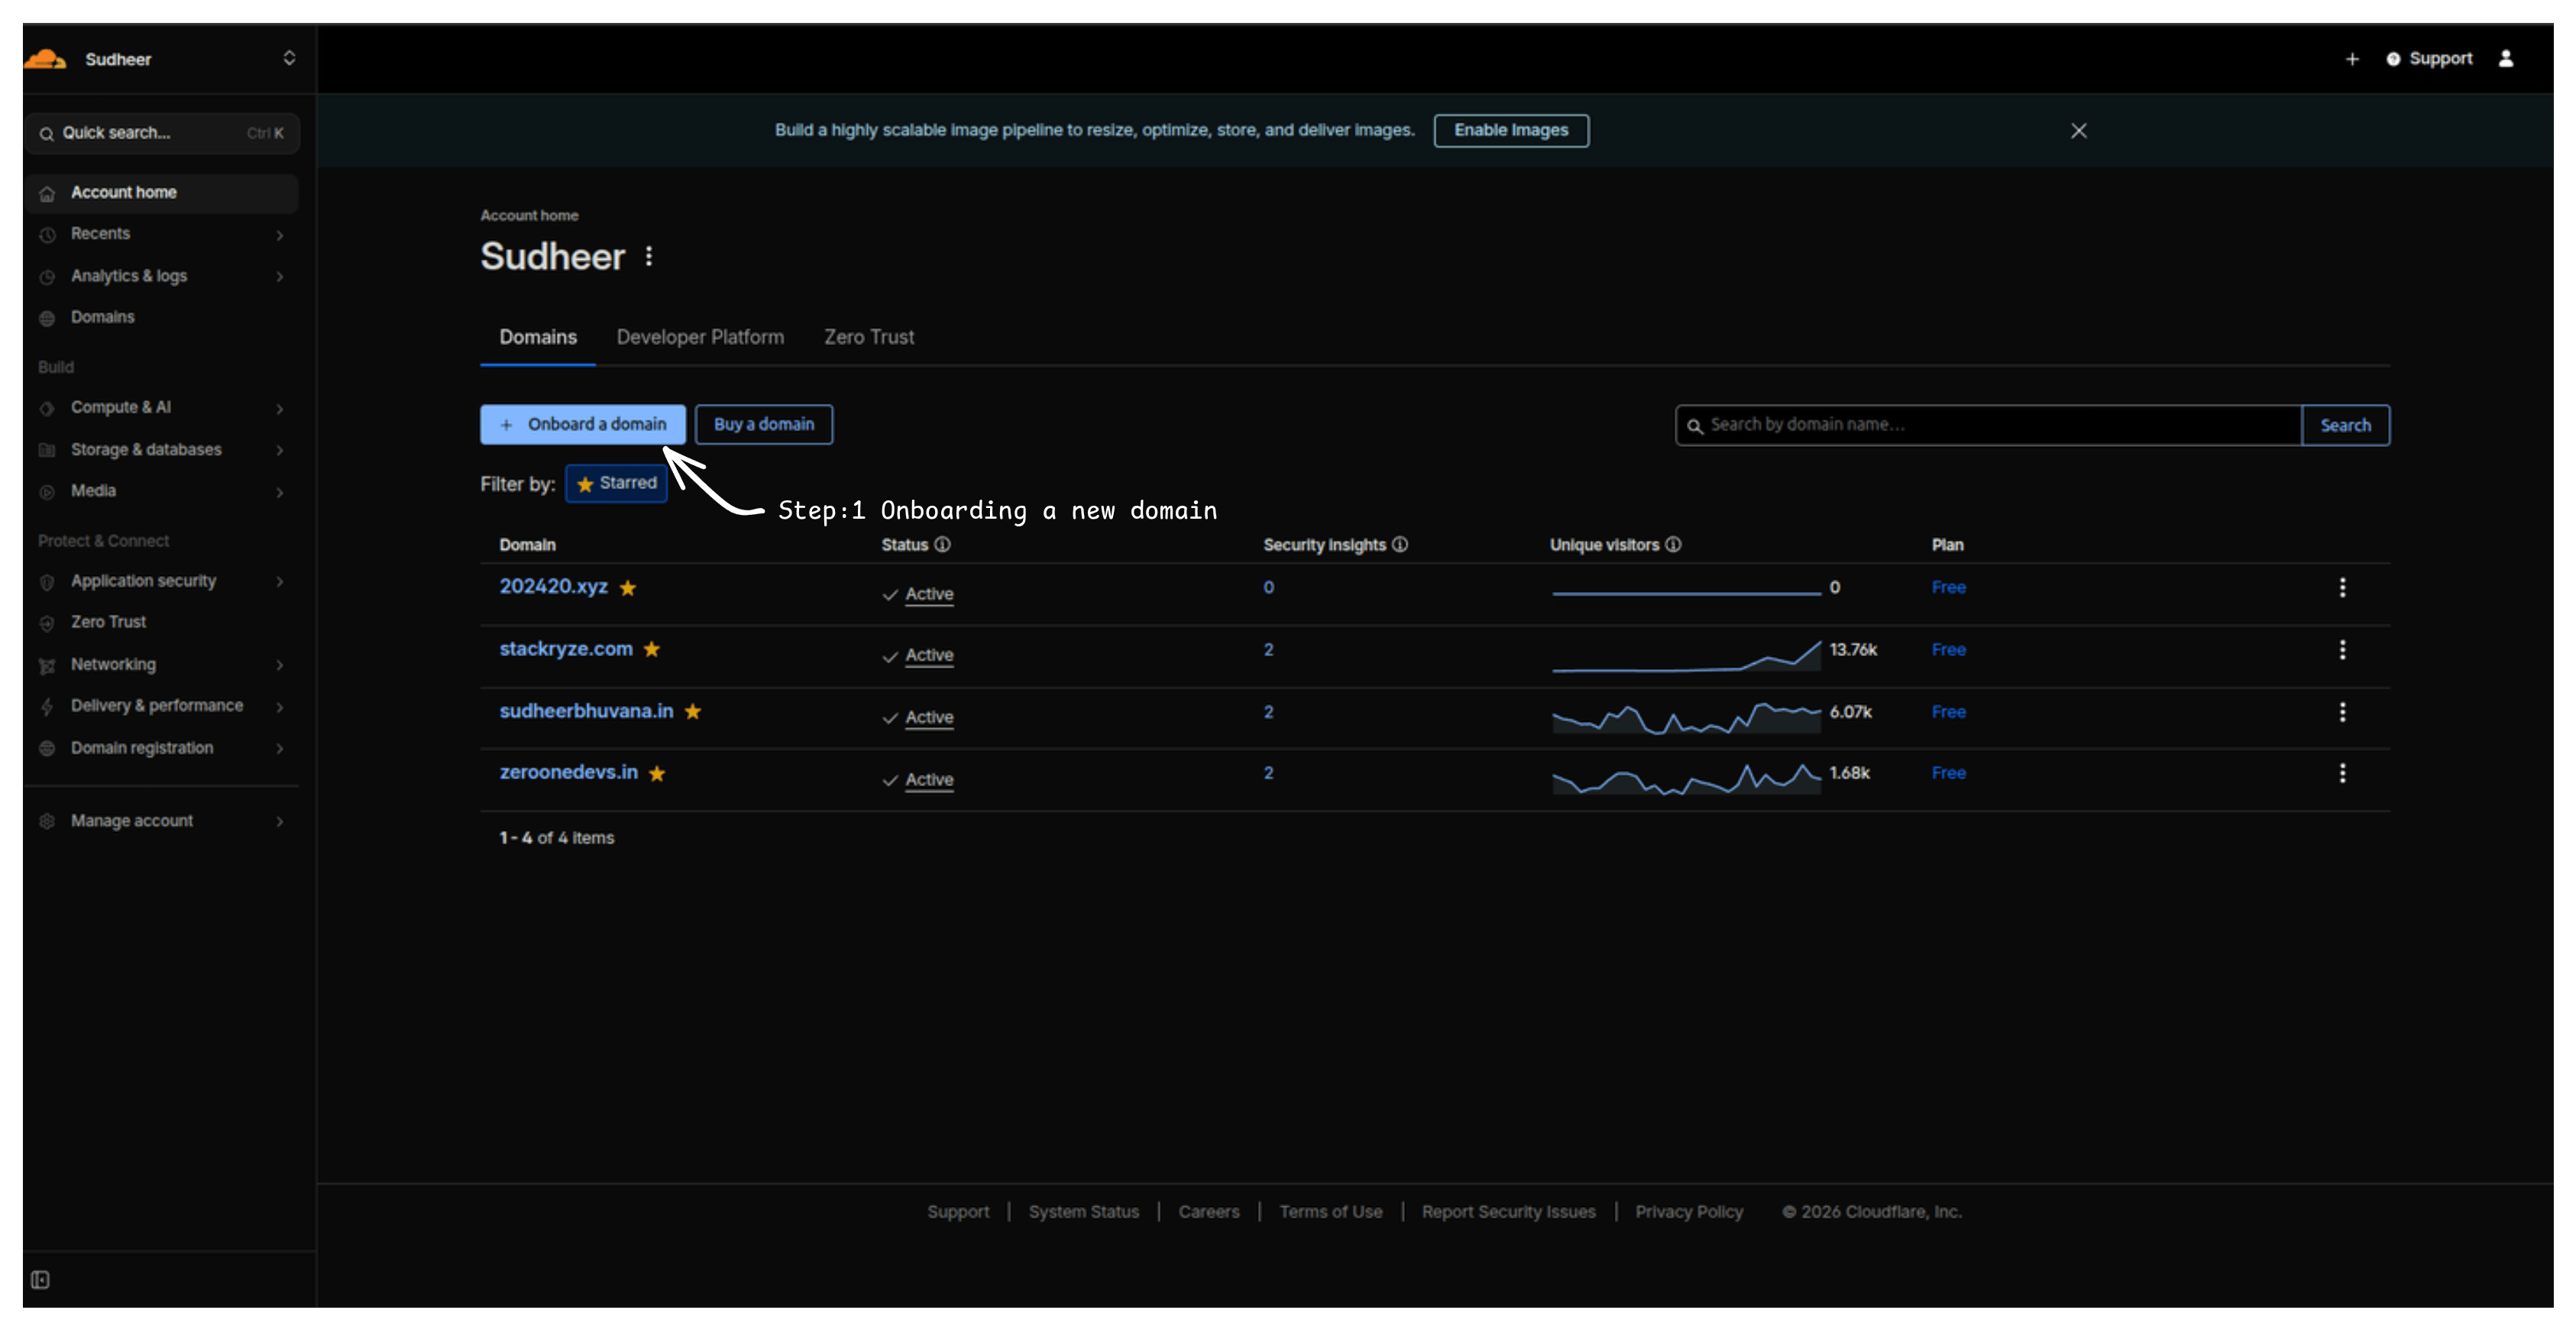 3. Enter your **full subdomain**, for example `yourname.indevs.in` (or whichever of the four Stackryze namespaces — `indevs.in`, `sryze.cc`, `ryzedns.org`, `nx.kg` — you registered under).
4. Click **Continue**.
3. Enter your **full subdomain**, for example `yourname.indevs.in` (or whichever of the four Stackryze namespaces — `indevs.in`, `sryze.cc`, `ryzedns.org`, `nx.kg` — you registered under).
4. Click **Continue**.
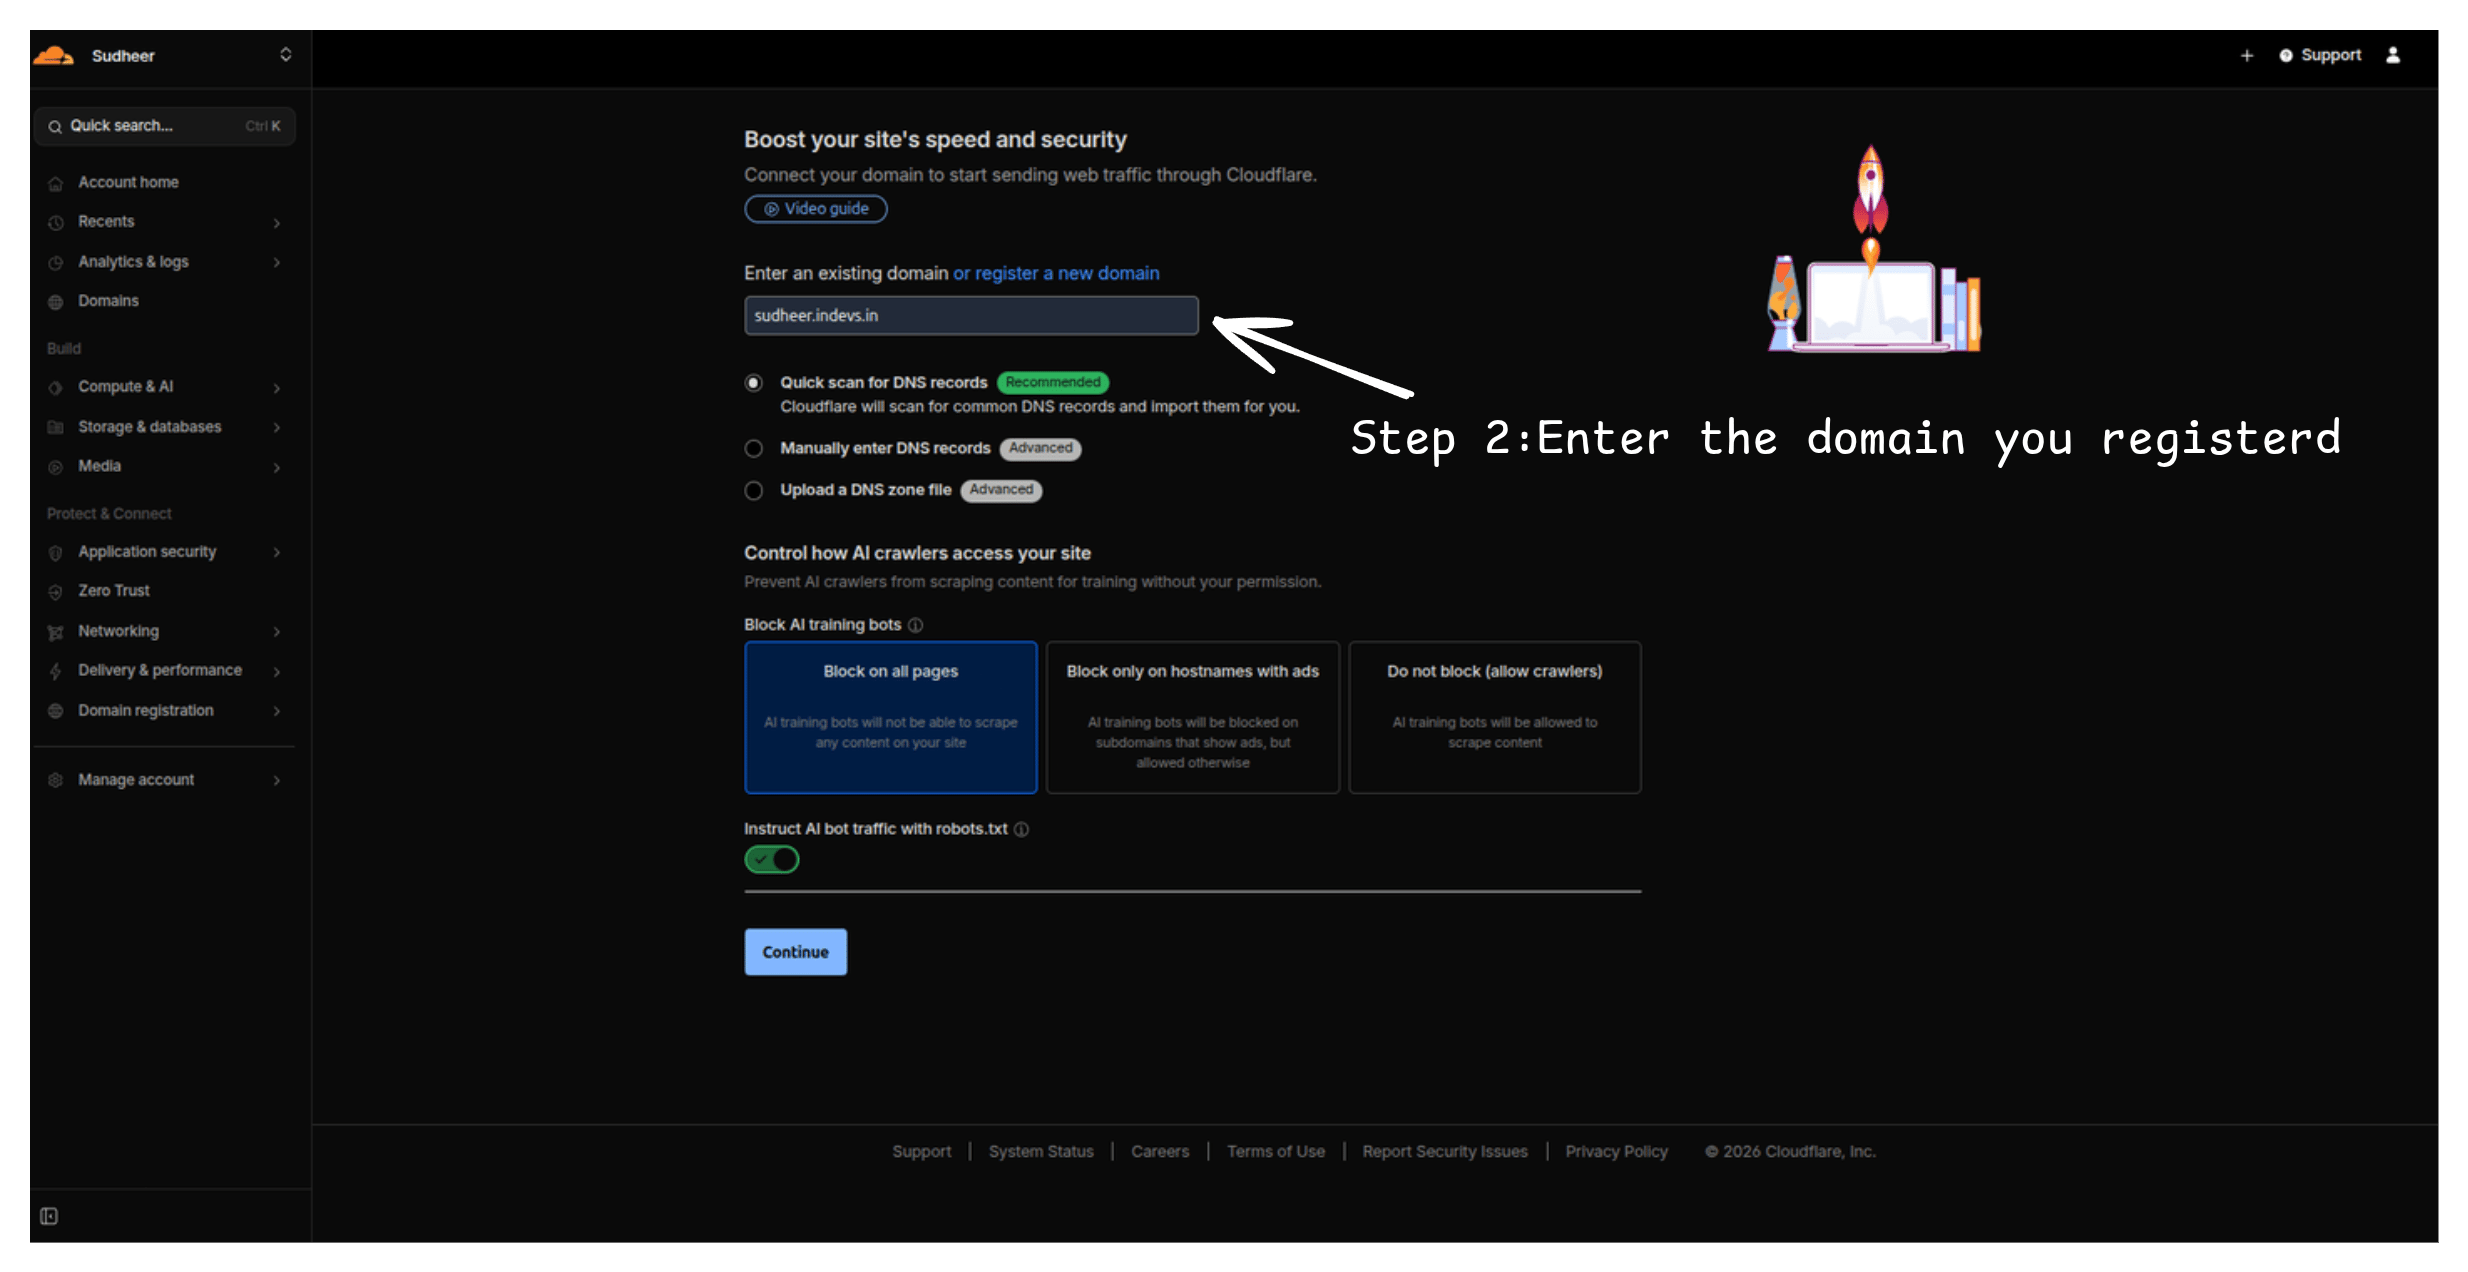 Enter your complete subdomain (`myproject.indevs.in`), not just the base domain.
## Step 2 — Select the Free plan
1. Select **Free**.
2. Click **Continue**.
Enter your complete subdomain (`myproject.indevs.in`), not just the base domain.
## Step 2 — Select the Free plan
1. Select **Free**.
2. Click **Continue**.
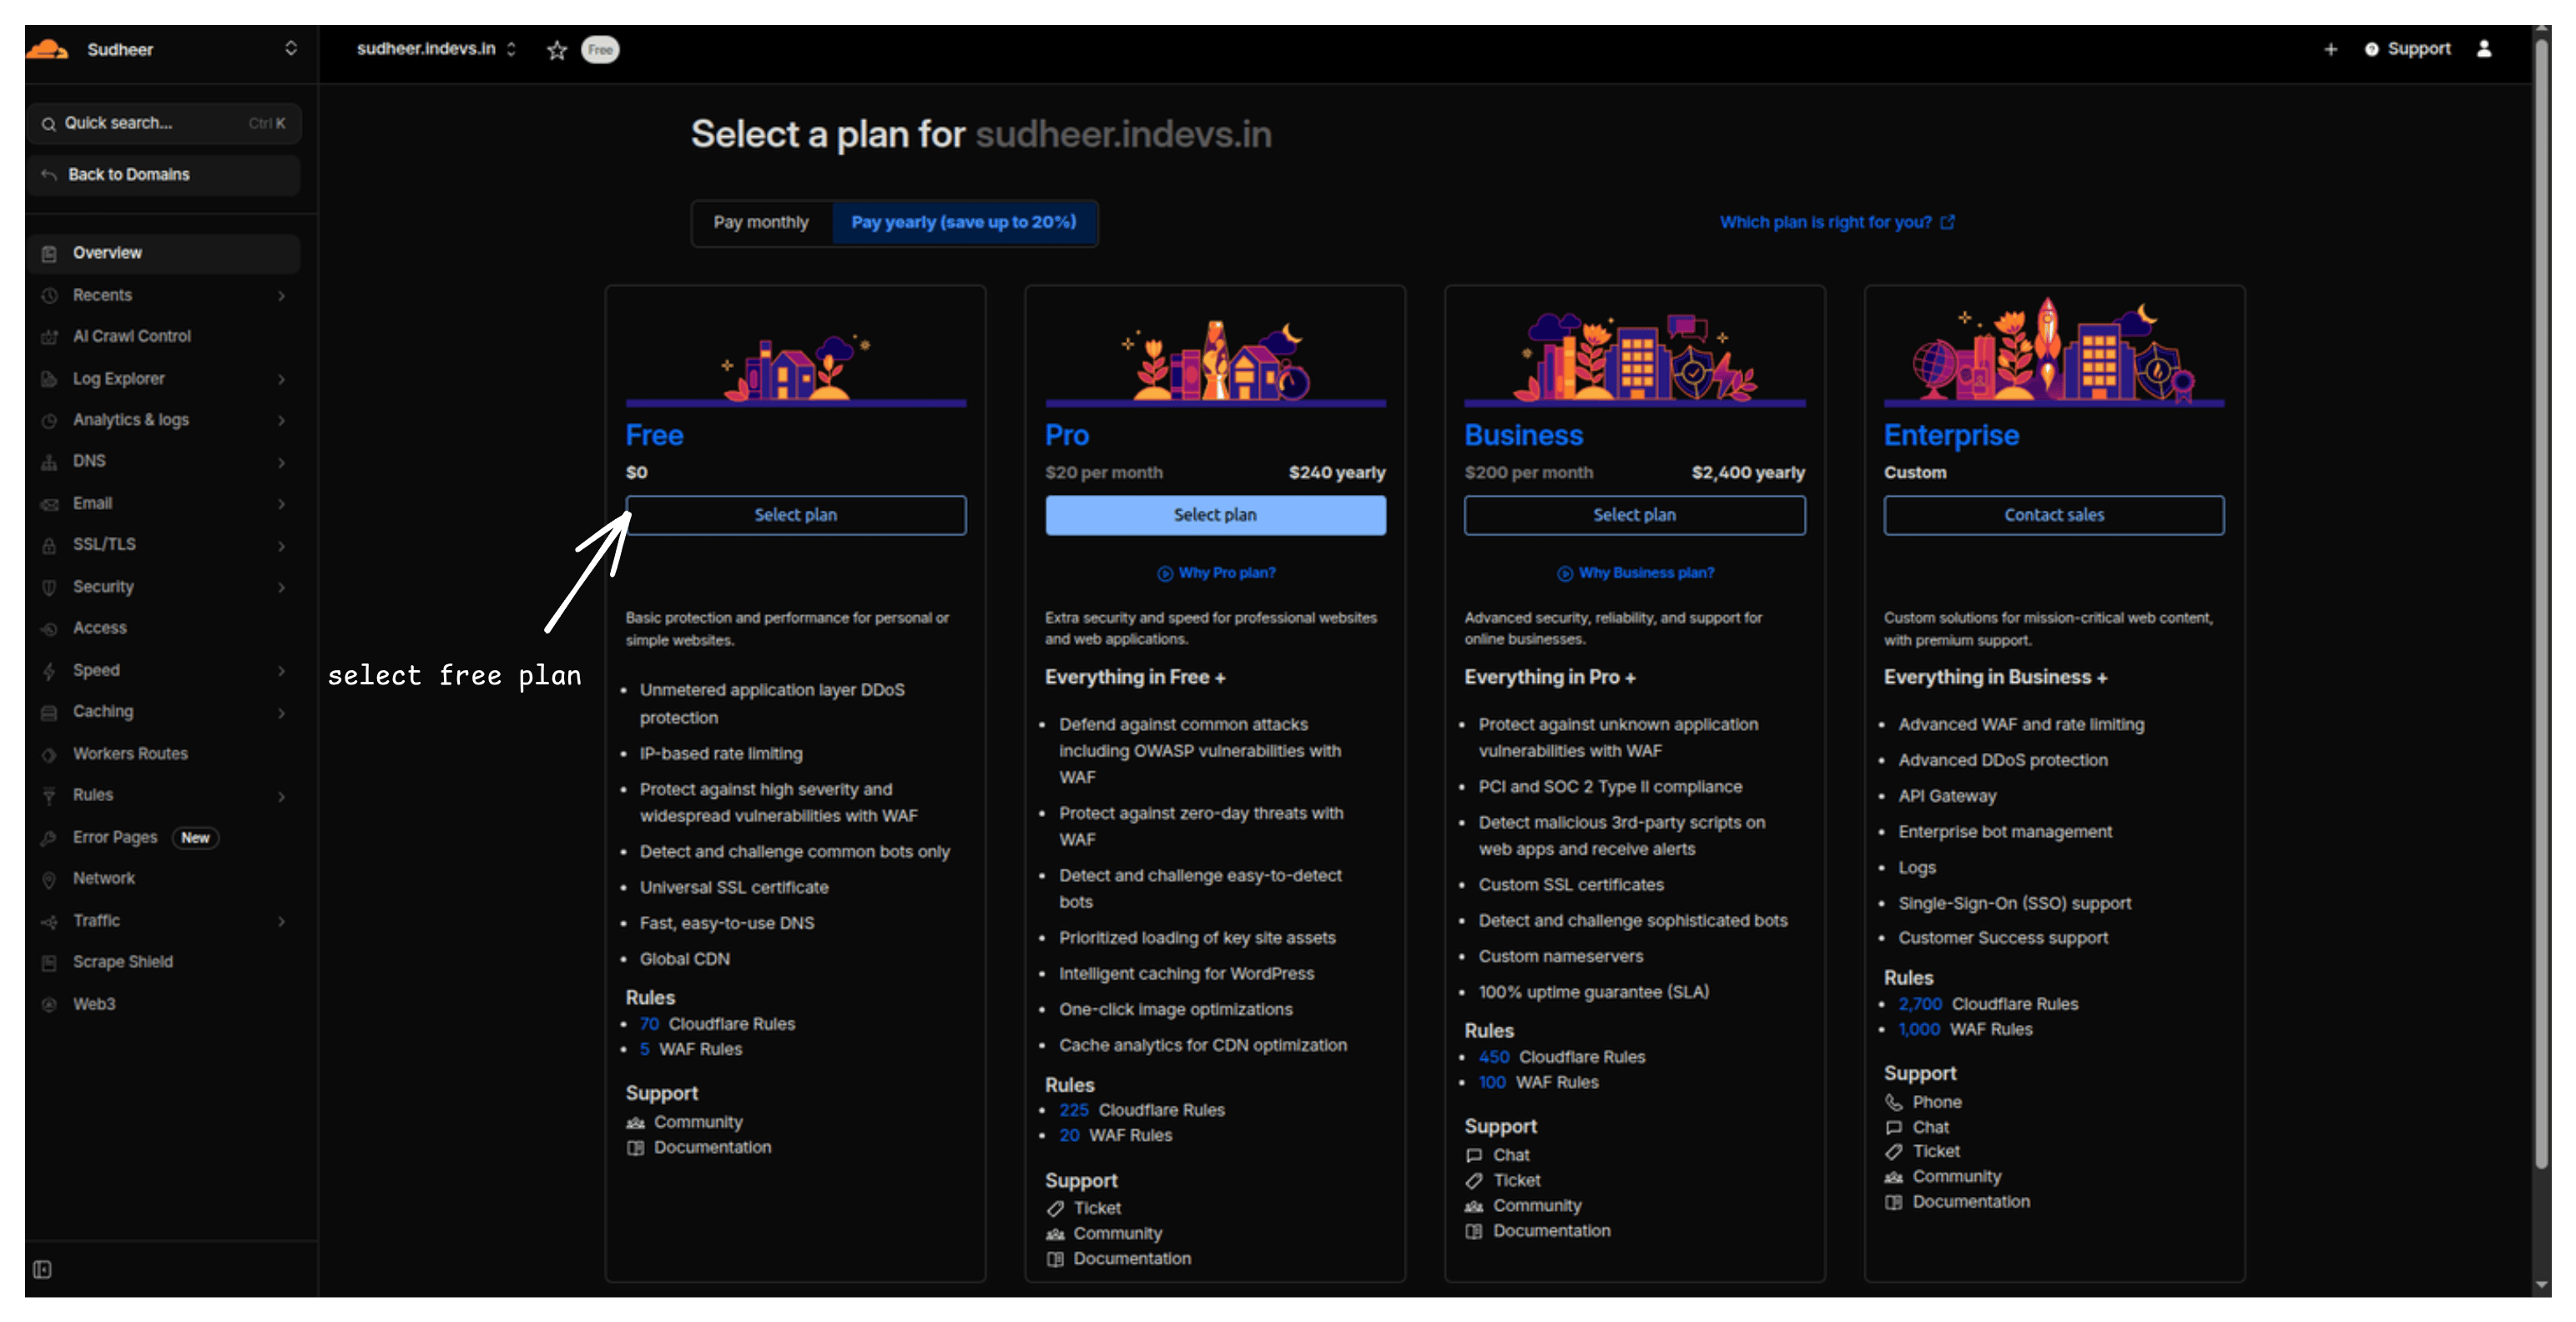 The Free plan includes everything you need for DNS hosting. Upgrade later if you need more.
## Step 3 — Copy your Cloudflare nameservers
Cloudflare assigns unique nameservers to your site:
1. Find the nameserver information on screen.
2. You'll see something like:
```text theme={null}
ava.ns.cloudflare.com
curt.ns.cloudflare.com
```
3. Copy both nameservers — you'll need them in the next step.
The Free plan includes everything you need for DNS hosting. Upgrade later if you need more.
## Step 3 — Copy your Cloudflare nameservers
Cloudflare assigns unique nameservers to your site:
1. Find the nameserver information on screen.
2. You'll see something like:
```text theme={null}
ava.ns.cloudflare.com
curt.ns.cloudflare.com
```
3. Copy both nameservers — you'll need them in the next step.
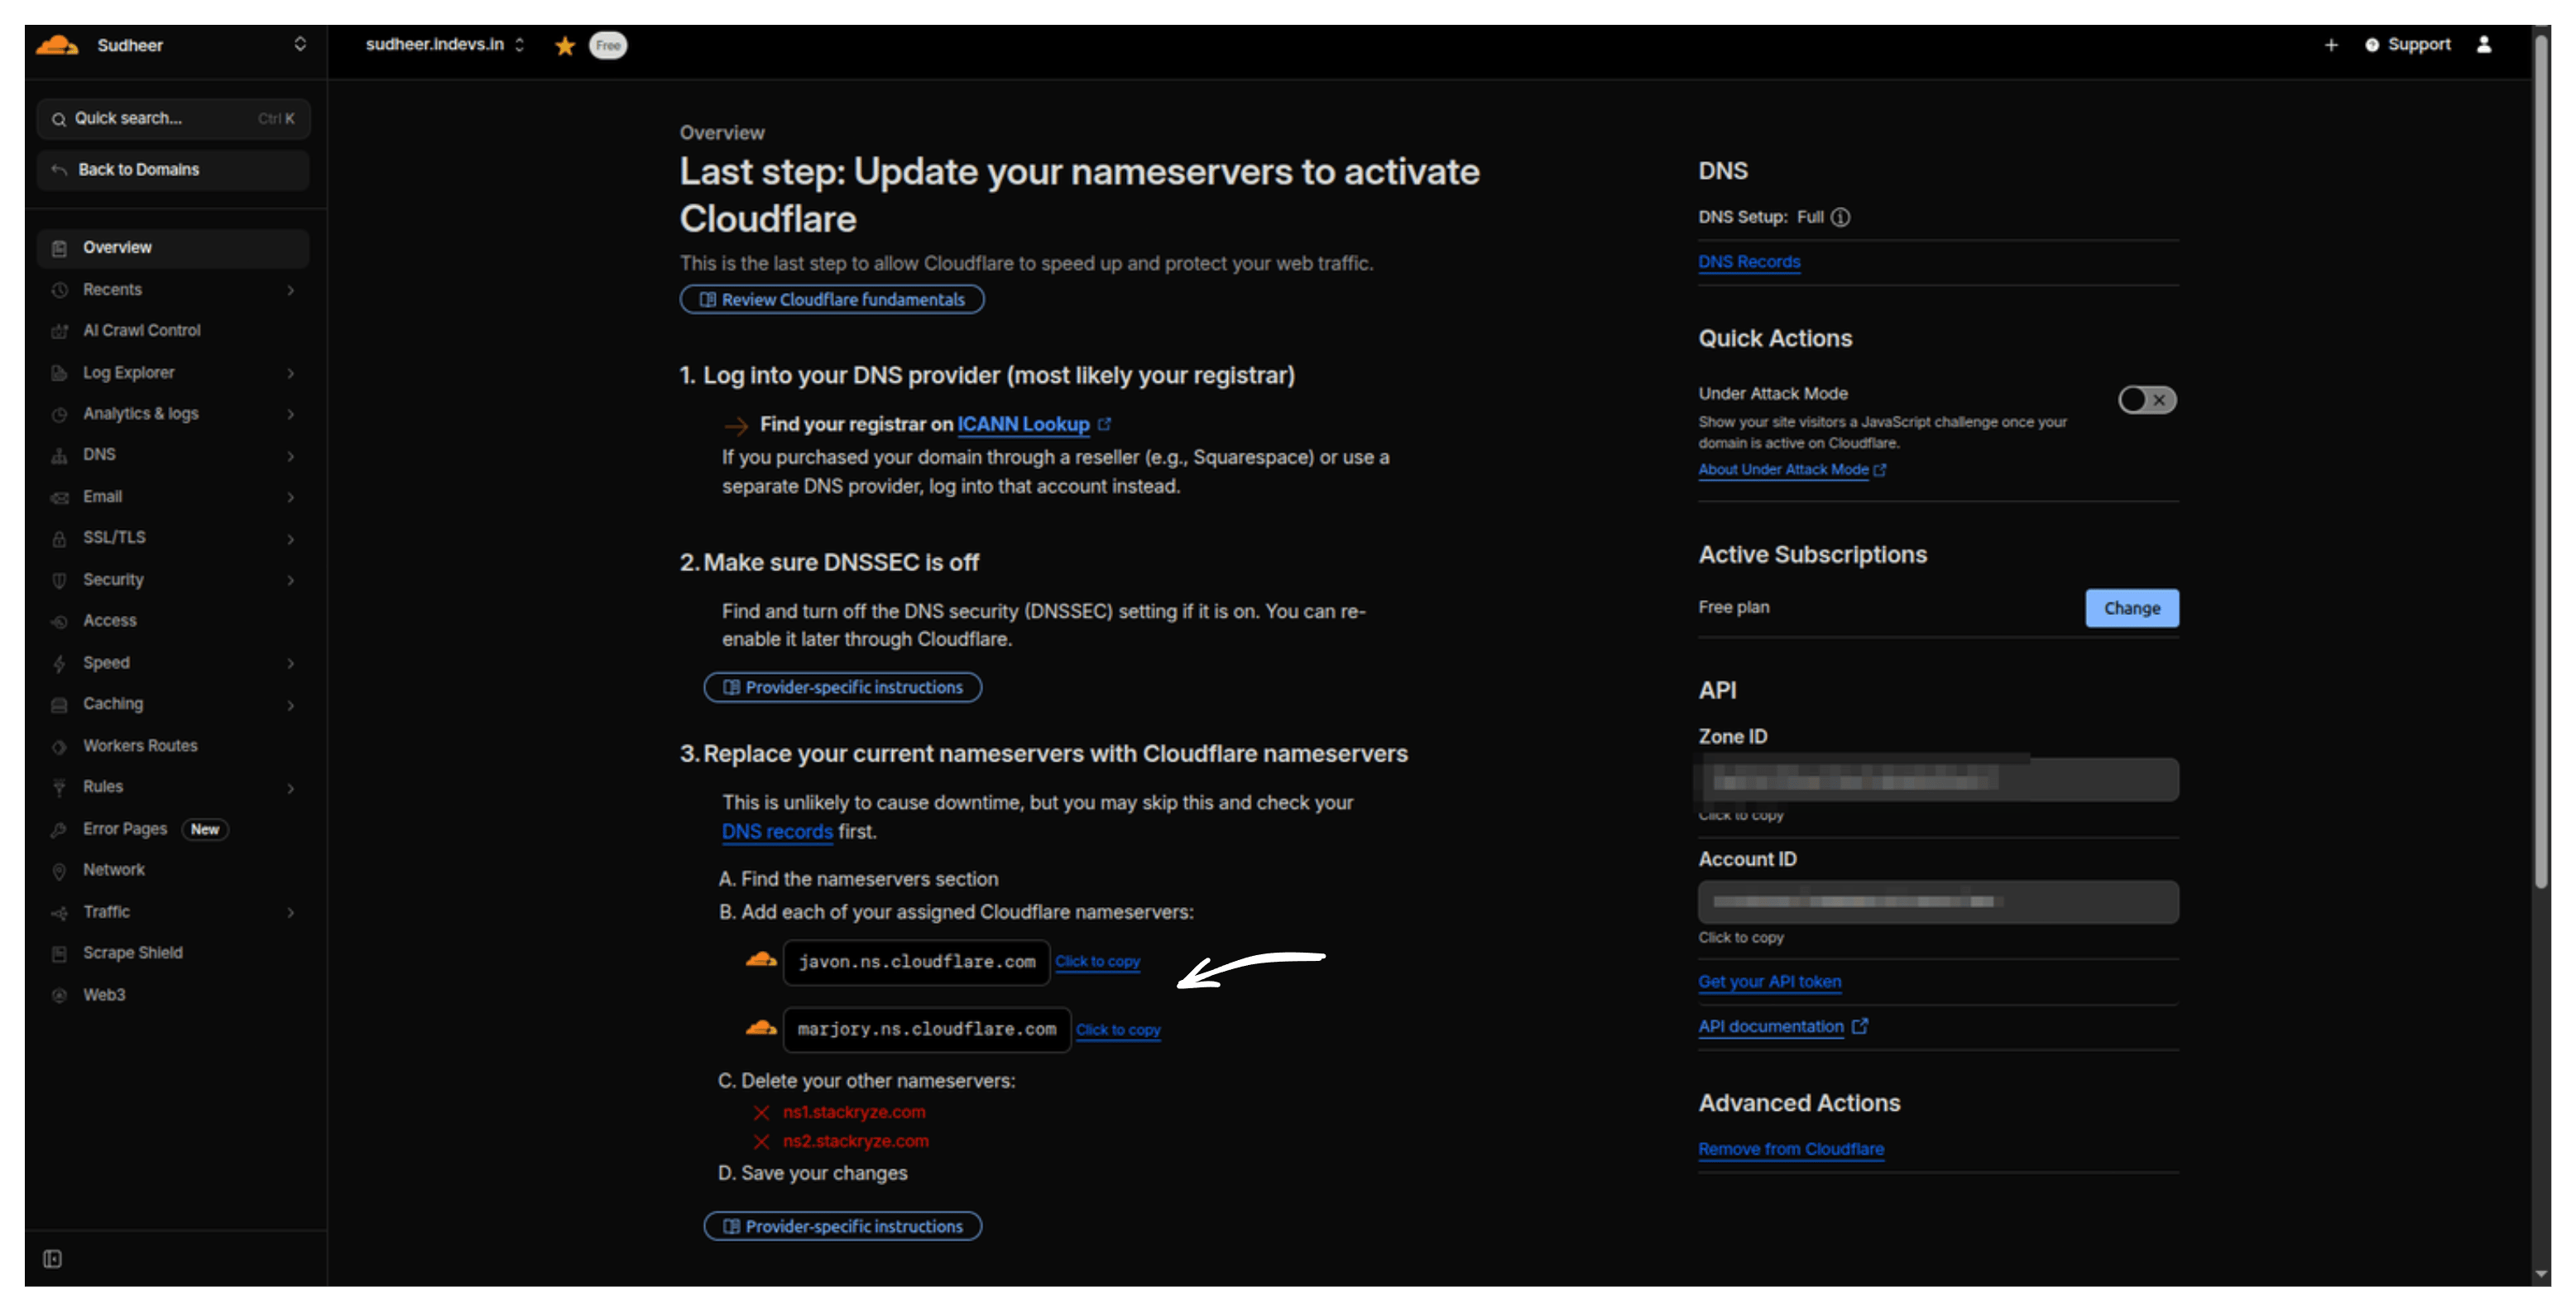 Your nameservers will differ from this example. Copy the exact values Cloudflare assigns.
**To find them later:** go to **DNS → Records**, then look at the **Cloudflare Nameservers** section. Or check the **Overview** tab.
## Step 4 — Update nameservers in Stackryze Domains
1. Open [domain.stackryze.com](https://domain.stackryze.com/).
2. Go to **My Domains**.
3. Click your domain.
4. In **DNS Configuration**, click **Edit**.
5. Replace the nameservers with your Cloudflare ones:
* **Primary:** `ava.ns.cloudflare.com`
* **Secondary:** `curt.ns.cloudflare.com`
6. Click **Save**.
DNS changes typically propagate in 5–10 minutes, but can take up to 48 hours globally.
## Step 5 — Verify the connection
1. Return to your Cloudflare dashboard **Overview** page.
2. Click **Check nameservers now** to start a check.
Your nameservers will differ from this example. Copy the exact values Cloudflare assigns.
**To find them later:** go to **DNS → Records**, then look at the **Cloudflare Nameservers** section. Or check the **Overview** tab.
## Step 4 — Update nameservers in Stackryze Domains
1. Open [domain.stackryze.com](https://domain.stackryze.com/).
2. Go to **My Domains**.
3. Click your domain.
4. In **DNS Configuration**, click **Edit**.
5. Replace the nameservers with your Cloudflare ones:
* **Primary:** `ava.ns.cloudflare.com`
* **Secondary:** `curt.ns.cloudflare.com`
6. Click **Save**.
DNS changes typically propagate in 5–10 minutes, but can take up to 48 hours globally.
## Step 5 — Verify the connection
1. Return to your Cloudflare dashboard **Overview** page.
2. Click **Check nameservers now** to start a check.
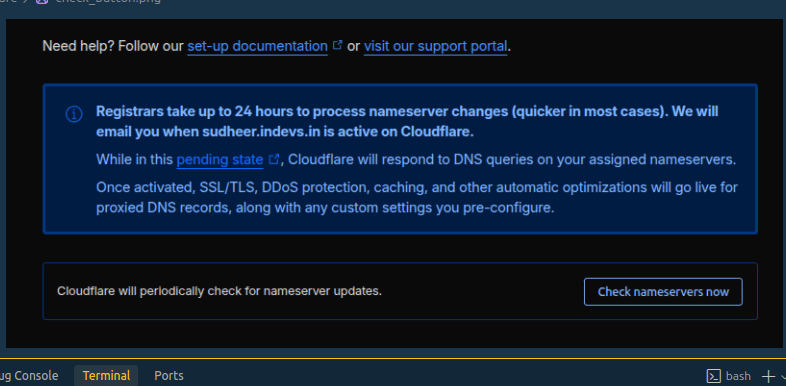 3. Cloudflare verifies your nameservers. This usually takes a few minutes, but can take up to 24 hours.
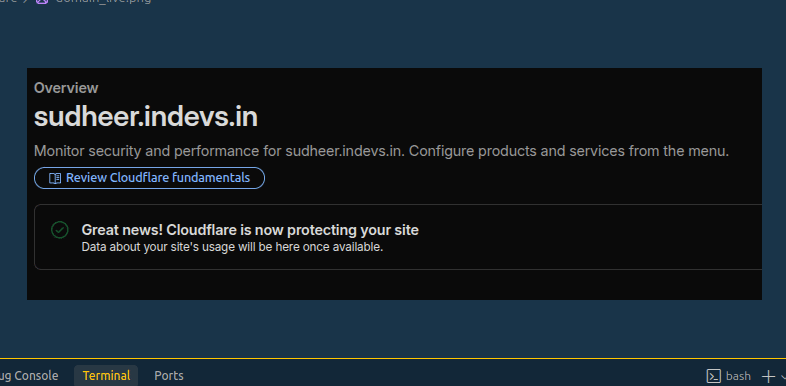
4. Cloudflare emails you when your site is active.
5. On success, you see a confirmation message:
3. Cloudflare verifies your nameservers. This usually takes a few minutes, but can take up to 24 hours.
4. Cloudflare emails you when your site is active.
5. On success, you see a confirmation message:
 ## Step 6 — Configure DNS records
Now add your DNS records in Cloudflare:
1. Go to **DNS → Records**.
## Step 6 — Configure DNS records
Now add your DNS records in Cloudflare:
1. Go to **DNS → Records**.
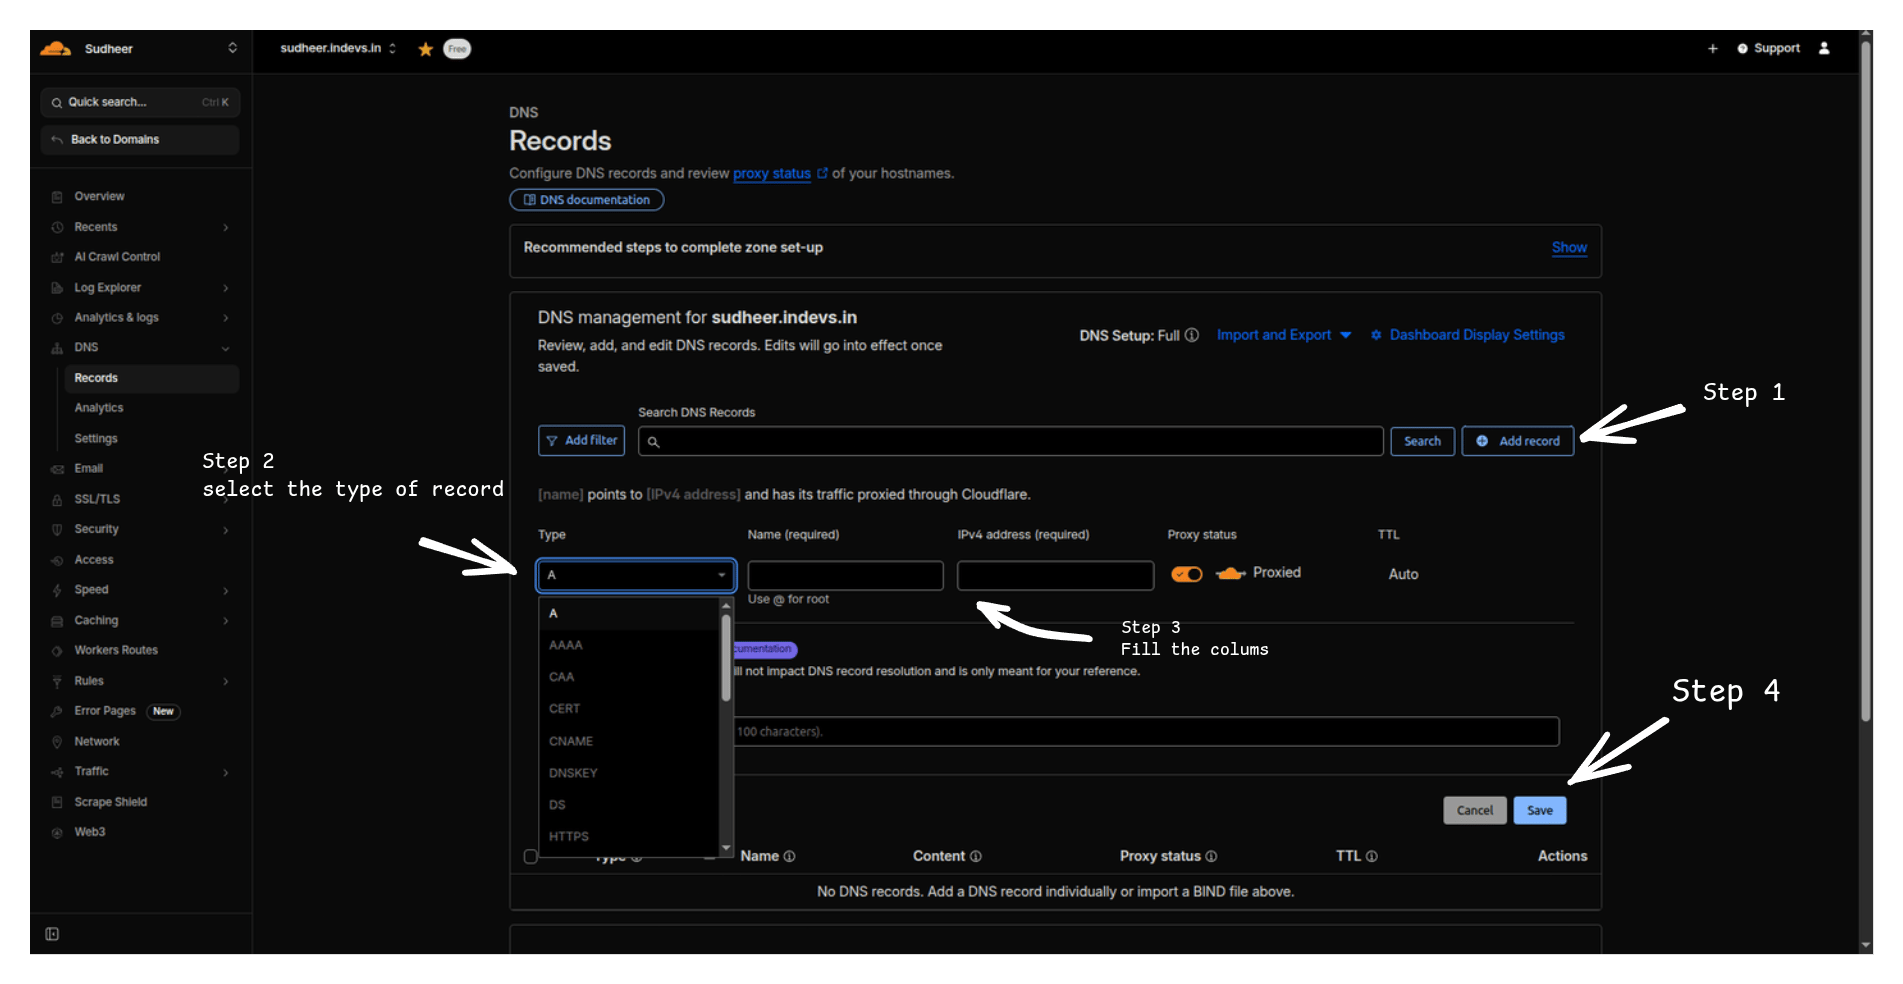
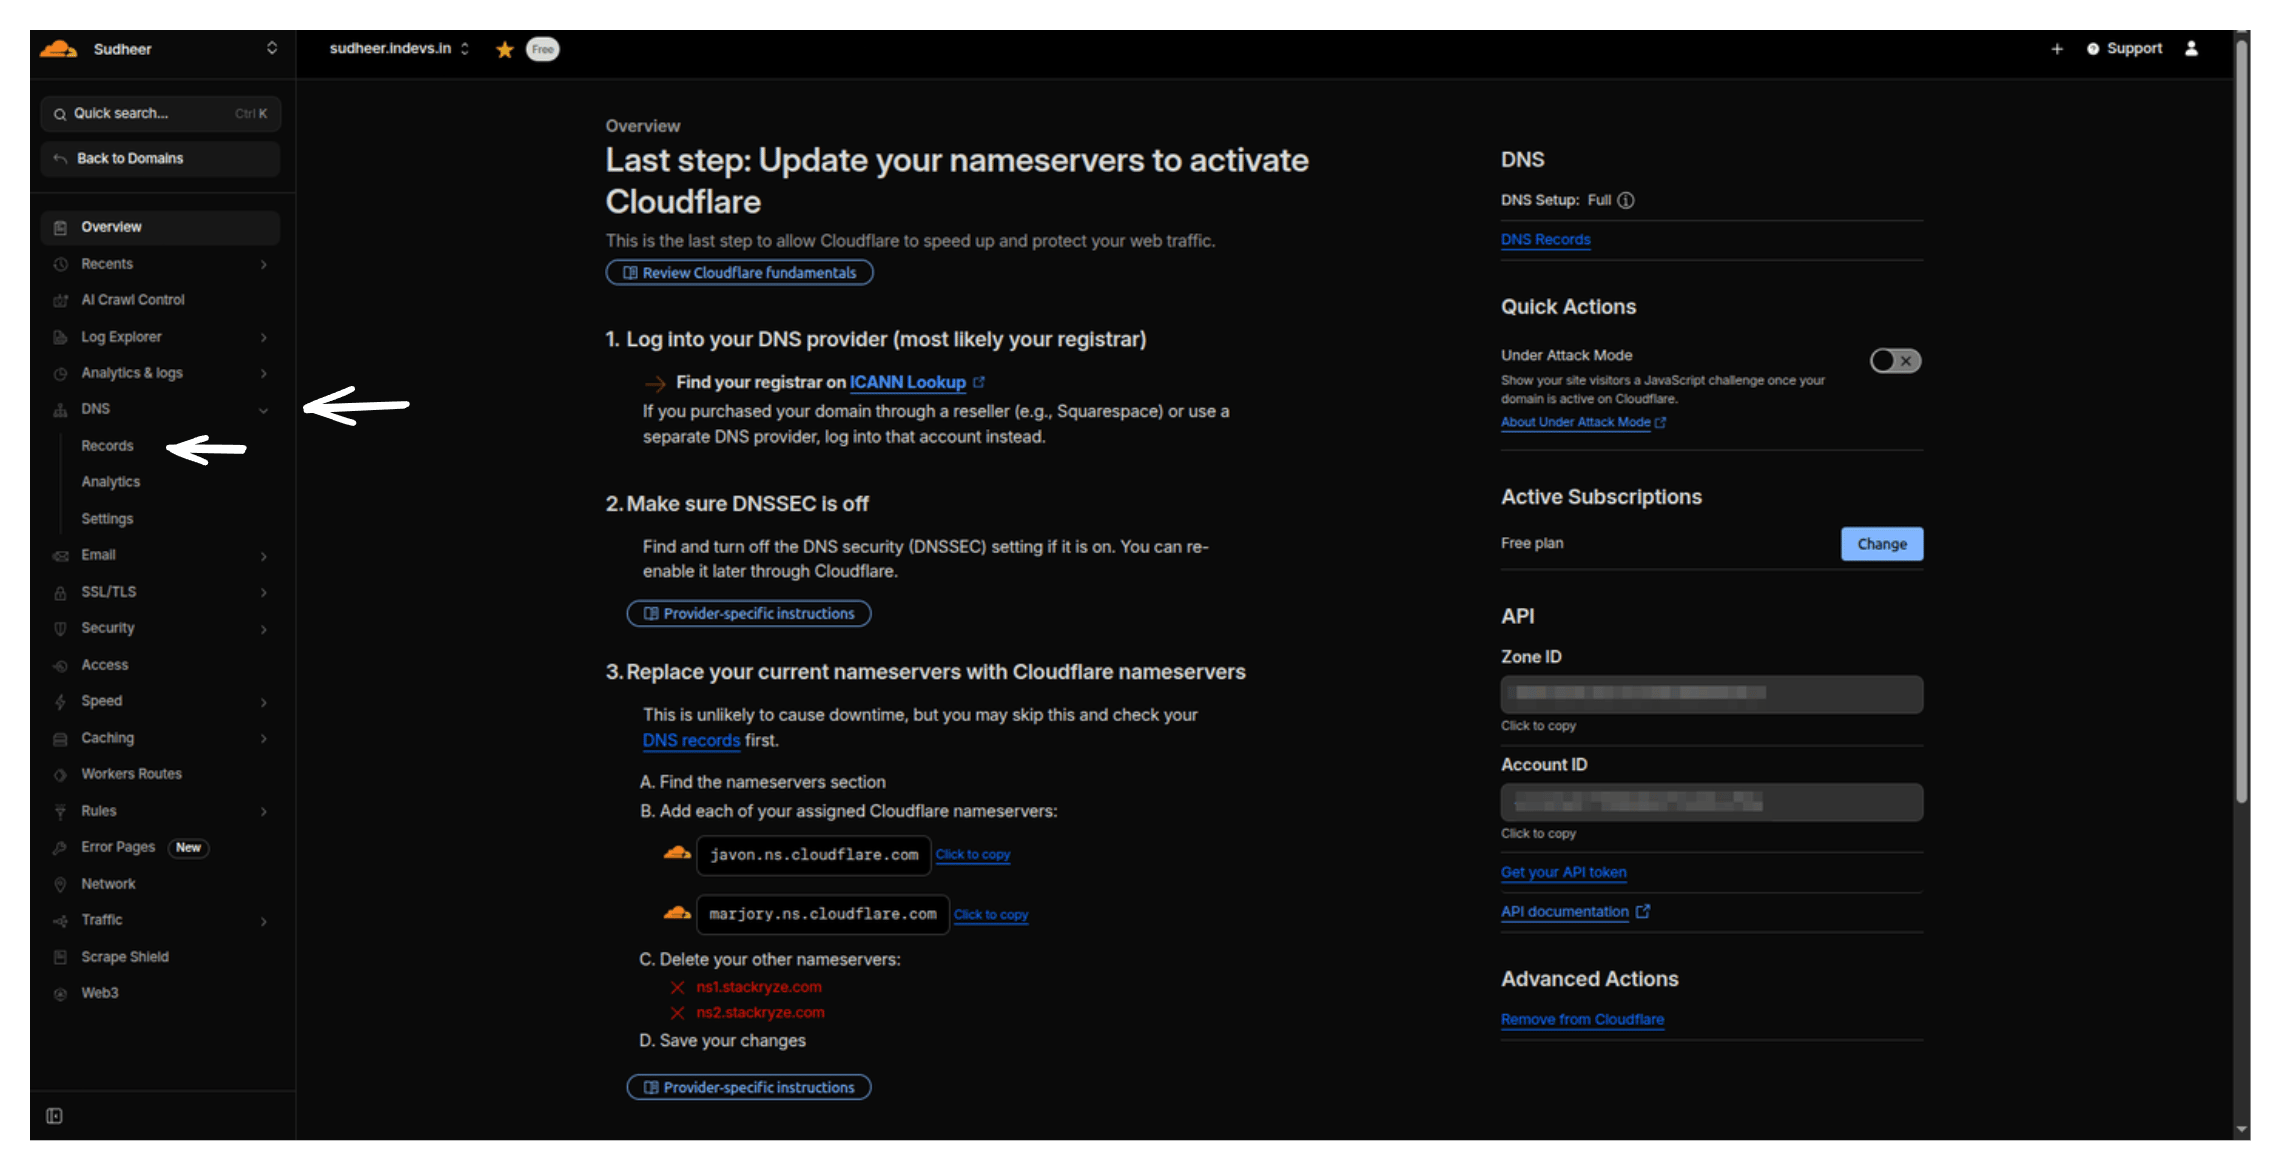 2. Click **Add record**.
3. Configure the record based on your needs:
2. Click **Add record**.
3. Configure the record based on your needs:
 **Example: GitHub Pages**
| Field | Value |
| ------------ | ------------------------- |
| Type | `CNAME` |
| Name | `@` (or your subdomain) |
| Target | `yourusername.github.io` |
| Proxy status | **DNS only** (gray cloud) |
| TTL | Auto |
**Example: IP address**
| Field | Value |
| ------------ | ------------------------- |
| Type | `A` |
| Name | `@` |
| IPv4 address | `192.0.2.1` |
| Proxy status | **DNS only** (gray cloud) |
| TTL | Auto |
**Example: WWW subdomain**
| Field | Value |
| ------------ | ------------------------- |
| Type | `CNAME` |
| Name | `www` |
| Target | `yourname.indevs.in` |
| Proxy status | **DNS only** (gray cloud) |
| TTL | Auto |
## Step 7 — Enable SSL (recommended)
Once your domain is live:
1. Go to **SSL/TLS**.
2. Set SSL mode to **Full** or **Full (strict)**.
3. Enable **Always Use HTTPS**.
Cloudflare provisions SSL certificates automatically. This can take up to 24 hours.
## Proxy status: orange vs gray cloud
* **Gray cloud (DNS only)** — recommended to start.
* DNS resolution only.
* No Cloudflare caching or protection.
* Required for some services (email, etc.).
* **Orange cloud (Proxied)** — optional.
* Traffic routes through Cloudflare.
* DDoS protection and caching.
* Can break some services (email, certain APIs).
Start with the gray cloud until your domain works, then experiment with proxying if needed.
## Common issues
### Nameservers not showing
Wait a few minutes after adding your site. Cloudflare needs to provision nameservers.
### DNS not resolving
* Confirm nameservers are correct in the Stackryze Domains dashboard.
* Wait 5–10 minutes for DNS propagation.
* Check DNS records in Cloudflare.
* Verify with [DNS Checker](https://dnschecker.org/).
### SSL errors
* Confirm your origin server supports HTTPS.
* Set SSL mode to **Flexible** if your origin doesn't have SSL.
* Wait up to 24 hours for the certificate to provision.
### Domain not working after setup
* Confirm nameservers in the Stackryze Domains dashboard match Cloudflare.
* Check DNS records in Cloudflare.
* Clear browser and DNS cache.
* Wait up to 48 hours for full propagation.
## Advanced features
* **Page Rules** — custom caching, redirects, and more.
* **Workers** — serverless code at the edge.
* **Analytics** — traffic statistics and insights.
* **API access** — automate DNS management.
## Resources
* [Cloudflare documentation](https://developers.cloudflare.com/)
* [Cloudflare community](https://community.cloudflare.com/)
* [DNS propagation checker](https://dnschecker.org/)
## Need help?
* [Discord community](https://discord.gg/wr7s97cfM7)
* [Email support](mailto:support@stackryze.com)
**Example: GitHub Pages**
| Field | Value |
| ------------ | ------------------------- |
| Type | `CNAME` |
| Name | `@` (or your subdomain) |
| Target | `yourusername.github.io` |
| Proxy status | **DNS only** (gray cloud) |
| TTL | Auto |
**Example: IP address**
| Field | Value |
| ------------ | ------------------------- |
| Type | `A` |
| Name | `@` |
| IPv4 address | `192.0.2.1` |
| Proxy status | **DNS only** (gray cloud) |
| TTL | Auto |
**Example: WWW subdomain**
| Field | Value |
| ------------ | ------------------------- |
| Type | `CNAME` |
| Name | `www` |
| Target | `yourname.indevs.in` |
| Proxy status | **DNS only** (gray cloud) |
| TTL | Auto |
## Step 7 — Enable SSL (recommended)
Once your domain is live:
1. Go to **SSL/TLS**.
2. Set SSL mode to **Full** or **Full (strict)**.
3. Enable **Always Use HTTPS**.
Cloudflare provisions SSL certificates automatically. This can take up to 24 hours.
## Proxy status: orange vs gray cloud
* **Gray cloud (DNS only)** — recommended to start.
* DNS resolution only.
* No Cloudflare caching or protection.
* Required for some services (email, etc.).
* **Orange cloud (Proxied)** — optional.
* Traffic routes through Cloudflare.
* DDoS protection and caching.
* Can break some services (email, certain APIs).
Start with the gray cloud until your domain works, then experiment with proxying if needed.
## Common issues
### Nameservers not showing
Wait a few minutes after adding your site. Cloudflare needs to provision nameservers.
### DNS not resolving
* Confirm nameservers are correct in the Stackryze Domains dashboard.
* Wait 5–10 minutes for DNS propagation.
* Check DNS records in Cloudflare.
* Verify with [DNS Checker](https://dnschecker.org/).
### SSL errors
* Confirm your origin server supports HTTPS.
* Set SSL mode to **Flexible** if your origin doesn't have SSL.
* Wait up to 24 hours for the certificate to provision.
### Domain not working after setup
* Confirm nameservers in the Stackryze Domains dashboard match Cloudflare.
* Check DNS records in Cloudflare.
* Clear browser and DNS cache.
* Wait up to 48 hours for full propagation.
## Advanced features
* **Page Rules** — custom caching, redirects, and more.
* **Workers** — serverless code at the edge.
* **Analytics** — traffic statistics and insights.
* **API access** — automate DNS management.
## Resources
* [Cloudflare documentation](https://developers.cloudflare.com/)
* [Cloudflare community](https://community.cloudflare.com/)
* [DNS propagation checker](https://dnschecker.org/)
## Need help?
* [Discord community](https://discord.gg/wr7s97cfM7)
* [Email support](mailto:support@stackryze.com)